RCN Camera Training Workshop
This workshop is a hands-on training programme for the RCN team, focused on getting confident with the Canon EOS R7 and Sigma 18–50mm f/2.8 lens.
You’ll learn to use the camera’s automatic and scene modes to take four kinds of photo:
Headshots
Group shots
Product photos for the RCN shop
Event photos in the auditorium
Along the way you’ll see how aperture, shutter speed and ISO work together, through short practical exercises.
Work through the twelve steps below in order. Each one opens to show exactly what to do.
-
The green A+ on the dial is full auto. The camera makes every decision for you.
Take off the lens cap.
Flip the screen out to the side and turn it to face you.
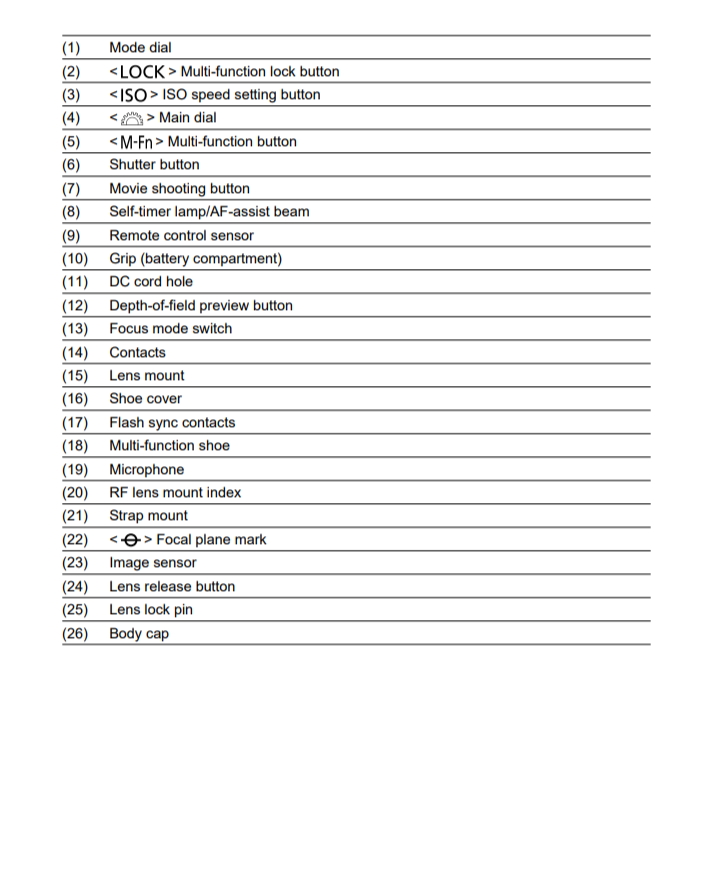
Find the power switch on the top right, by your thumb. Click it to ON. If the screen shows video settings, you have gone one click too far. Click back to ON.
Find the mode dial on the top right. Turn it until the green A+ lines up with the white mark.
Hold the camera in your right hand by the grip. Support the lens from underneath with your left hand.
Point the camera at your subject.
Press the shutter button halfway down and hold it there. A box appears on the screen.
Wait for the box to turn green. Green means in focus.
Press the shutter button all the way down. You have taken a photo.
The photo shows on the screen for about two seconds.
Try this: everyone photograph the same object on A+. Keep this photo. You will compare it with your best shot at the end.
-
You only need five controls today.
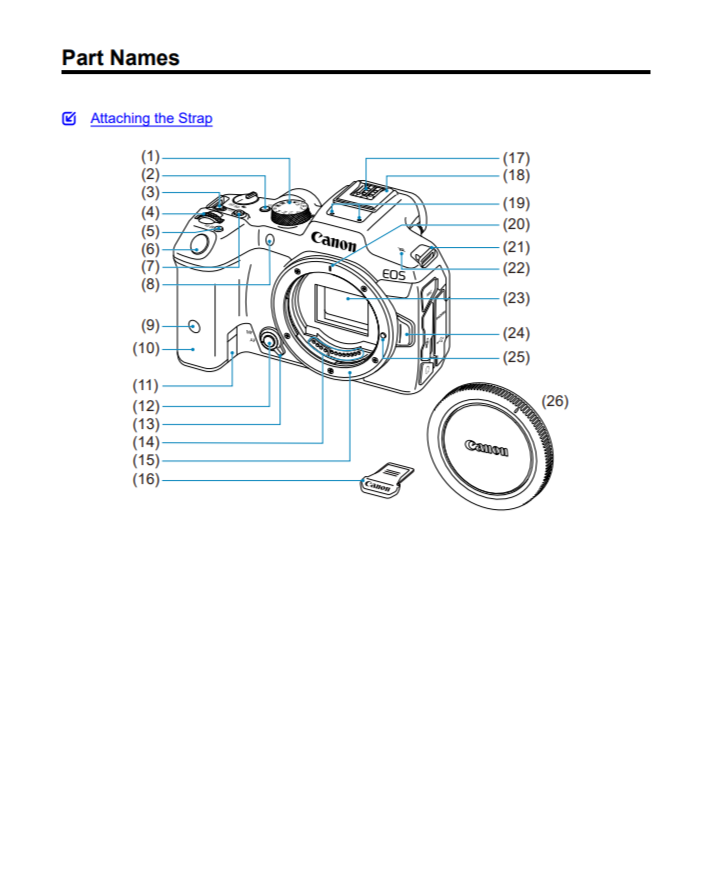
Power switch: top right, by your thumb. OFF, ON, and a movie-camera position for video.
Mode dial: top right. Today you use two positions: the green A+ and SCN.
Shutter button: on the grip under your index finger. Halfway to focus, all the way to shoot.
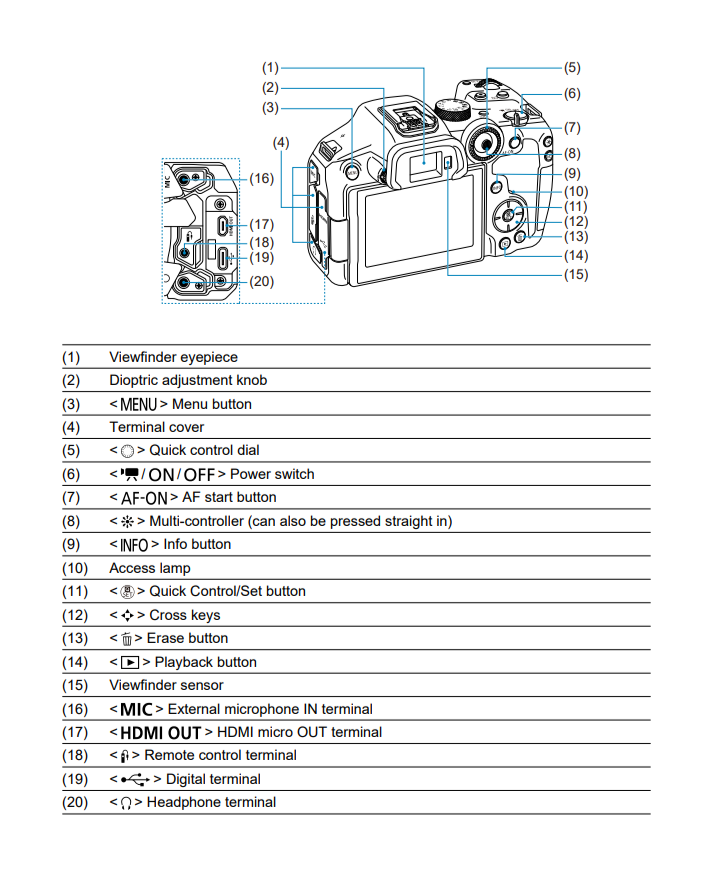
SET button: on the back, in the middle of the four arrow keys. It confirms a choice.
Playback button: on the back, bottom right. It shows your photos.
Two more you will use now and then:
Main dial: the ridged wheel just behind the shutter button. It scrolls through choices.
Zoom ring: the wide ring on the lens. Turn it to go from 18 (wide) to 50 (closer).
Try this: one person calls out a control and the others point to it on their camera.
-
Press the Playback button on the back, bottom right. Your last photo appears.
Turn the Main dial to move through your photos.
To zoom in, pinch outwards on the screen with two fingers, like on a phone.
Drag with one finger to move around the photo.
To go back to shooting, press the shutter button halfway.
-
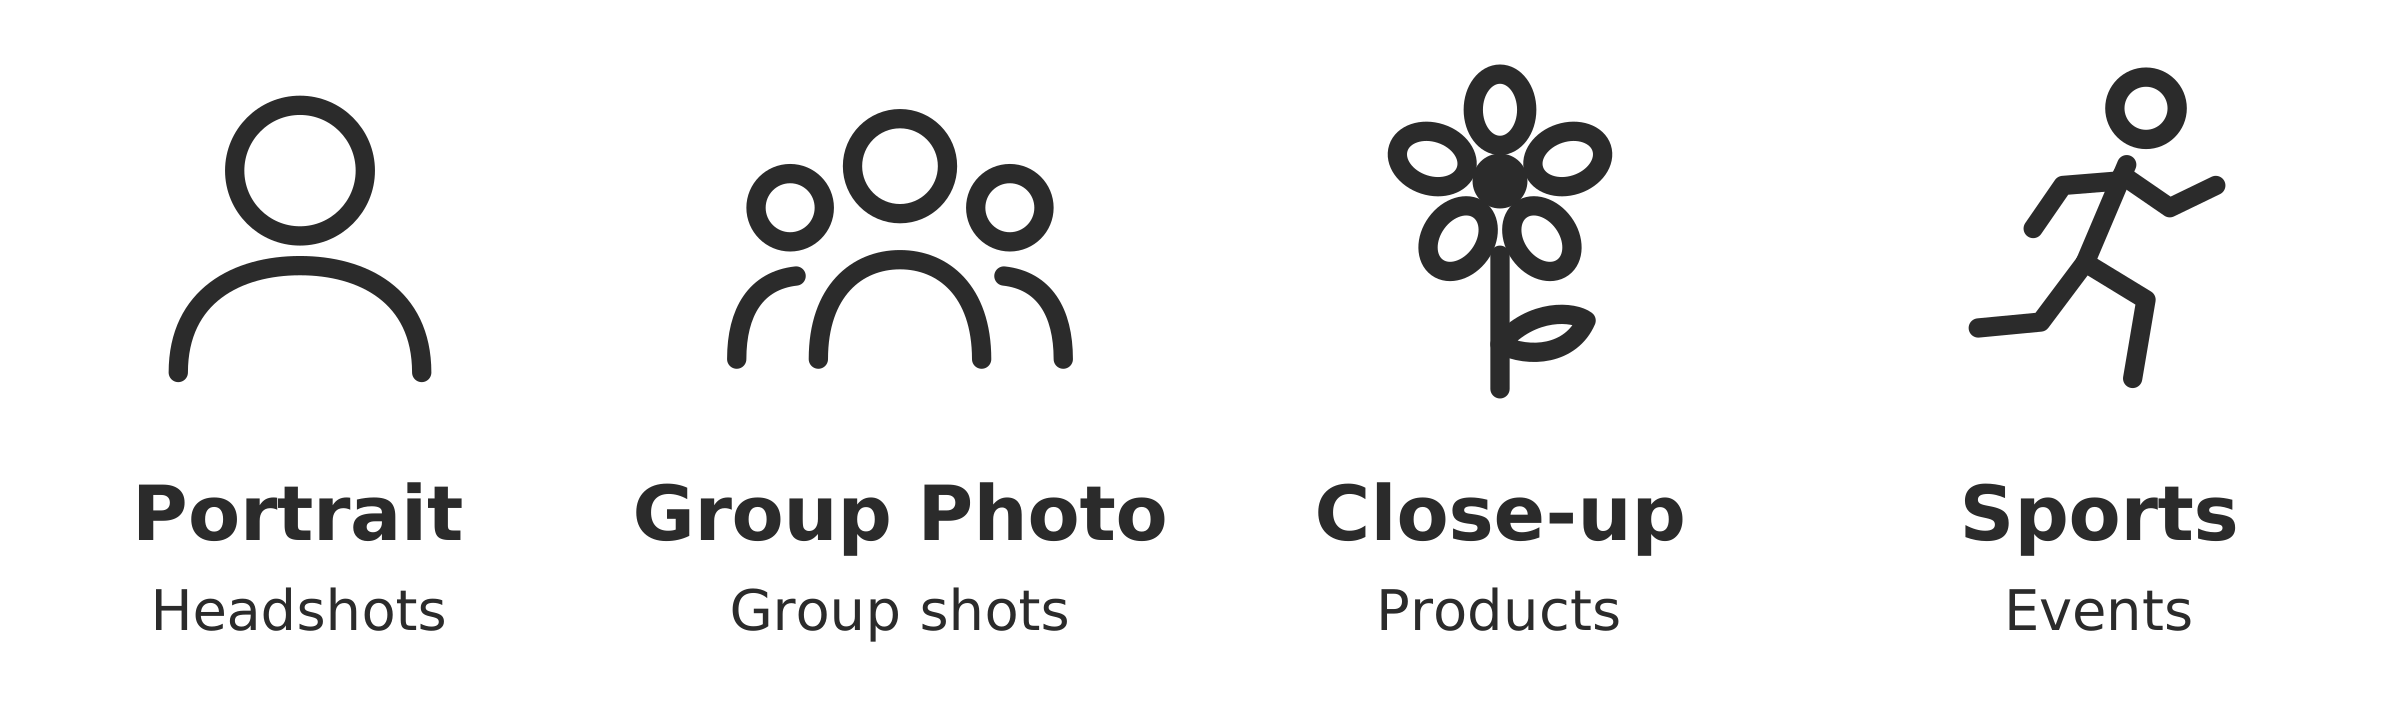
Scene modes are Canon's ready-made settings for common jobs. Each one has a small picture: a head, a group of people, a flower, a runner.
Turn the mode dial to SCN.
Press the SET button on the back.
Turn the Main dial (the ridged wheel behind the shutter button). The pictures scroll past on the screen.
Stop on the one you want.
Press SET again. The name of the mode shows on the screen.
The four you need:
Portrait (head): one person. Headshots.
Group Photo (group of people): two or more people.
Close-up (flower): small objects. Products for the shop.
Sports (runner): people who are moving. Events and speakers.
Try this: one person calls out a job, such as "new starter needs a photo" or "mug for the shop". Everyone else races to the right picture.
-
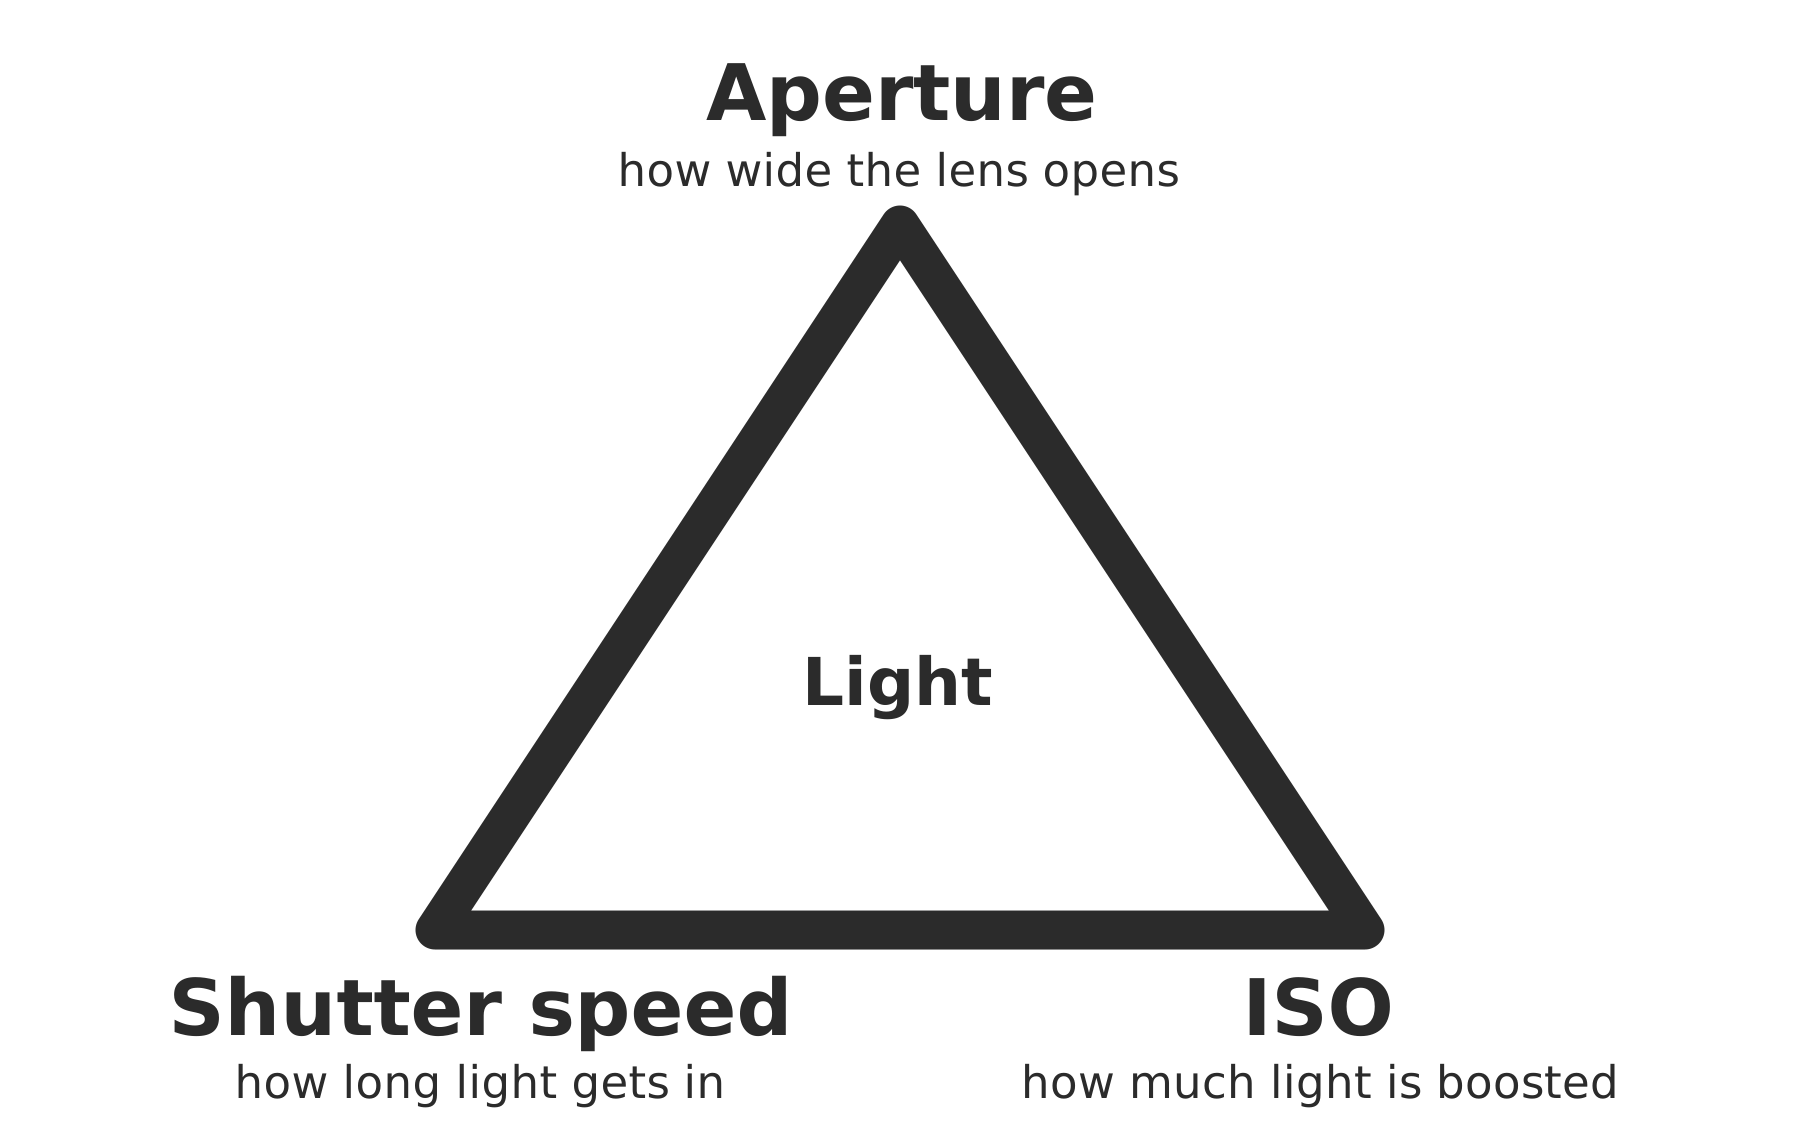
Every photo needs the right amount of light. The camera controls light in three ways. Together they are called the exposure triangle.
Aperture: the size of the hole in the lens. It is written as an f-number. A low f-number (f/2.8) is a wide hole: lots of light and a blurred background. A high f-number (f/8) is a small hole: less light and everything sharp.
Shutter speed: how long the camera lets light in. Fast (1/500) freezes movement. Slow (1/15) blurs it.
ISO: how much the camera boosts the light it has. A high ISO makes a dark room look bright, but adds grain.
Every scene mode works in the same three steps:
The camera measures the light.
The scene mode sets its priority first. Portrait sets a wide aperture. Sports sets a fast shutter.
The camera adjusts the other two until the light balances.
To see what the camera chose, press the shutter button halfway and read the numbers along the bottom of the screen.
-
Aperture: tube and straw
Hold a toilet roll tube up to one eye. Notice how bright and wide the view is.
Now look through a drinking straw. The view is darker and narrower.
The tube is a wide aperture, like f/2.8. The straw is a small aperture, like f/8.
Shutter speed: the fan
Switch the desk fan on.
Turn the mode dial to the green A+.
Photograph the fan. Press Playback and look at the blades.
Turn the mode dial to SCN. Press SET, turn the Main dial to Sports (runner), press SET.
Photograph the fan again. Press Playback and compare the blades.
Sports uses a faster shutter, so the blades look more frozen.
Balance: the rope triangle
Three people each hold one corner of the rope triangle. The corners are aperture, shutter speed and ISO.
Pull the rope tight. That is a correct exposure.
One person takes a step in. The rope goes slack.
Another person steps out until it is tight again.
That is what the camera does in every scene mode. Change one corner and another has to move.
-
How Portrait thinks: aperture first. It opens the lens as wide as it goes to blur the background and make the person stand out. It also softens skin tones. Lots of light comes in, so the camera balances with shutter speed and ISO.
Set the camera
Turn the mode dial to SCN.
Press SET.
Turn the Main dial to Portrait (the head).
Press SET.
Turn the zoom ring on the lens to 50.
Set up the shot
Stand or sit your person at least two metres in front of the background. The bigger the gap, the more the background blurs.
Face them towards a window or the brightest light in the room.
Stand about a metre and a half away from them.
Frame them from the chest up.
Take the shot
Press the shutter button halfway. A box lands on their face.
Wait for the box to turn green.
Read the numbers at the bottom of the screen. Say the f-number out loud.
Press all the way down.
Take three or four shots. People blink.
Press Playback and zoom in on the eyes to check they are sharp.
Try this: the fairy lights
Hang the fairy lights about two metres behind your person and switch them on.
Take a headshot in Portrait. Look at the lights in the photo. They should be soft glowing circles.
Now change mode: press SET, turn the Main dial to Group Photo (group of people), press SET.
Take the same shot. Read the f-number. It should be higher than before.
Press Playback and compare the two. In Group Photo the lights are smaller and sharper, and the background is busier.
Change back to Portrait before you carry on.
What you learned: a wide aperture (low f-number) blurs the background. That is why Portrait is the right choice for one person.
Swap over so everyone has a turn as photographer and as sitter.
-
How Group Photo thinks: aperture first, the other way round. It closes the lens to a smaller hole so people at the front and the back are all sharp. Less light comes in, so the shutter stays open a little longer. Hold the camera steady.
Set the camera
Turn the mode dial to SCN.
Press SET.
Turn the Main dial to Group Photo (the group of people).
Press SET.
Turn the zoom ring towards 18.
Set up the shot
Arrange people in one or two rows, close together, shoulders overlapping.
Step back until everyone fits with a little space around the edges.
Check nobody is hidden behind someone else.
Take the shot
Tuck your elbows into your body to keep the camera still.
Press the shutter button halfway. Wait for green.
Read the f-number at the bottom of the screen. Compare it with the one you saw in Portrait.
Press all the way down.
Take at least five shots. In a group, someone always blinks.
Press Playback and zoom in on a face in the back row to check it is sharp.
Try this: the row of toys
Line up five toys in a row running away from you, front to back.
Turn the zoom ring to 50 and stand about a metre away.
In Group Photo, press halfway, wait for green, and shoot.
Press Playback and zoom in on the back toy. It should be sharp, or close to it.
Now change mode: press SET, turn the Main dial to Portrait (the head), press SET.
Tap the front toy on the screen to focus on it, then shoot.
Press Playback and zoom in on the back toy again. It is now soft.
Change back to Group Photo before you carry on.
What you learned: a small aperture (high f-number) keeps more of the scene sharp from front to back. That is why Group Photo is the right choice for more than one person.
-
How Close-up thinks: it is tuned for small things photographed near the lens. A plain background and a steady camera do the rest.
Set the camera
Turn the mode dial to SCN.
Press SET.
Turn the Main dial to Close-up (the flower).
Press SET.
Turn the zoom ring to 50.
Set up the shot
Lay one sheet of white card flat on a table near a window.
Stand the second sheet up behind it as a backdrop.
Place the product in the middle of the flat sheet.
Remove everything else from view.
Put the camera on the tripod, level with the product.
Take the shot
Look at the screen and move the tripod until the product fills about two thirds of the frame.
Tap the product on the screen. The camera focuses where you tap.
Wait for the box to turn green.
Press the shutter button gently, all the way down.
Press Playback and zoom in on any lettering to check it is sharp.
Turn the product and repeat for a second angle.
Try this: too close
Take the camera off the tripod.
Move slowly towards the product, pressing the shutter button halfway as you go.
At some point the box turns orange instead of green. The lens cannot focus this close.
Move back until the box turns green again. That is your closest working distance.
What you learned: for products, keep the background plain, keep the camera steady, and do not get too close.
-
How Sports thinks: shutter speed first. It uses a very fast shutter to freeze movement. That lets in little light, so the lens opens wide and the ISO goes up. In a dim room that means some grain, which is a fair trade for a sharp photo.
Set the camera
Turn the mode dial to SCN.
Press SET.
Turn the Main dial to Sports (the runner).
Press SET.
Take the shot
Point the camera at the speaker.
Press the shutter button halfway and keep it there. A blue box follows the speaker as they move.
When the moment looks good, press all the way down and hold. The camera fires a burst of shots.
Let go after a second or two.
Press Playback, turn the Main dial through the burst, and pick the best one.
Good to know
Sports mode is noisy. In a quiet room, choose Silent shutter from the same scene list. It takes one silent shot at a time.
Flash does not work in Sports mode.
If the shutter speed number at the bottom of the screen is blinking, the room is very dark. Brace yourself against a wall or a chair.
Try this: the glow stick speaker
Dim the room lights.
One person is the speaker. They walk slowly and wave a glow stick as they talk.
Photograph them in Sports. Press Playback and look at the glow stick and their hands.
Now change mode: press SET, turn the Main dial to Portrait (the head), press SET.
Photograph them again. Press Playback and compare. The hands and glow stick are more likely to blur.
Go back to a Sports photo and zoom right in. The speckle you can see is grain from the high ISO.
What you learned: a fast shutter freezes movement. In low light the camera pays for it with a higher ISO, which adds grain.
-
Pick a card, choose the scene mode without help, and take the shot.
"A new director starts Monday and needs a photo for the website. You have five minutes."
"The background behind your sitter is a messy office. Make it disappear."
"Twelve nurses are handing in a petition. Get all of them sharp."
"Two rows, front and back. Nobody blurry."
"The shop has a new mug and needs a clean picture by lunchtime."
"Shoot this badge so the lettering is readable."
"The speaker is pacing the stage and the lights are low."
"Catch someone clapping without blurry hands."
Answers: 1 and 2 Portrait. 3 and 4 Group Photo. 5 and 6 Close-up. 7 and 8 Sports.
-
The dials do nothing. The LOCK button on top has been pressed. Press it again.
The screen shows video settings. The power switch has gone one click past ON. Click it back.
The lens will not focus. Check the switch on the front of the camera, beside the lens. It should be on AF, not MF.
The focus box is orange, not green. You are too close, or there is nothing clear to focus on. Step back and try again.
The camera keeps firing. Portrait and Sports shoot for as long as you hold the button. Lift your finger sooner.
I cannot find the scene pictures. Turn the mode dial to SCN, then press SET.
The viewfinder is black. It switches off when the screen is flipped out. Use the screen.
The photo is blurry. Hold the camera with both hands, tuck your elbows in, and press the shutter gently.
Reference guide
You don’t need this section for the workshop. It’s here for afterwards, when you want to look up a button or dial, or try one of the camera’s other modes. This page stays online, so bookmark it and come back whenever you need a reminder.
-
Turning the camera on
Using the screen
Using the viewfinder
Holding the camera
The shutter button
Main dial
Quick Control dial
Multi-controller
M-Fn button
AF-ON button
LOCK button
INFO button
Menu operations and settings
Quick Control
Touchscreen operation
Inserting and removing memory cards
-
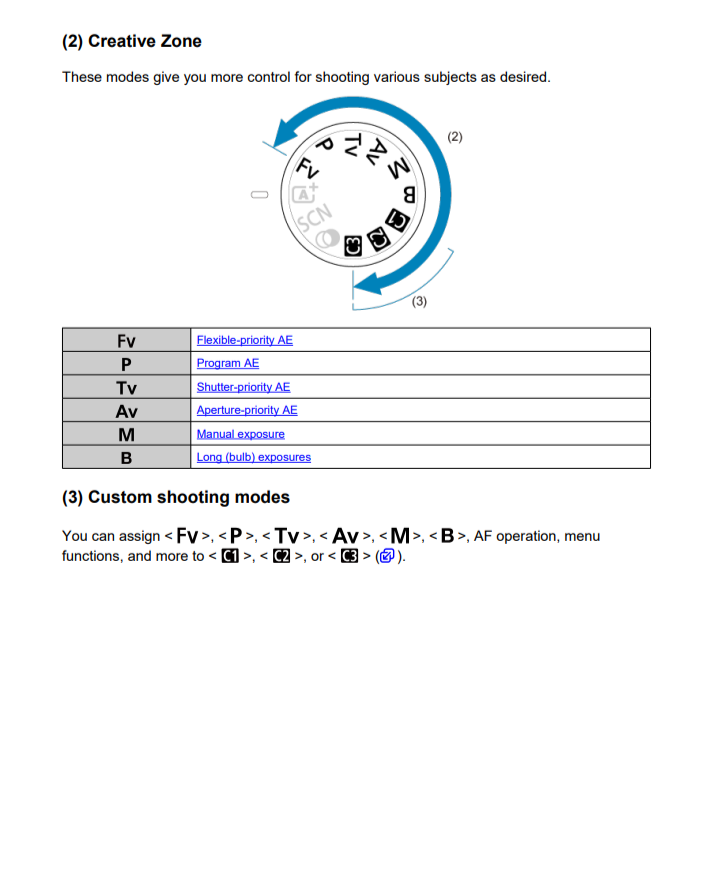
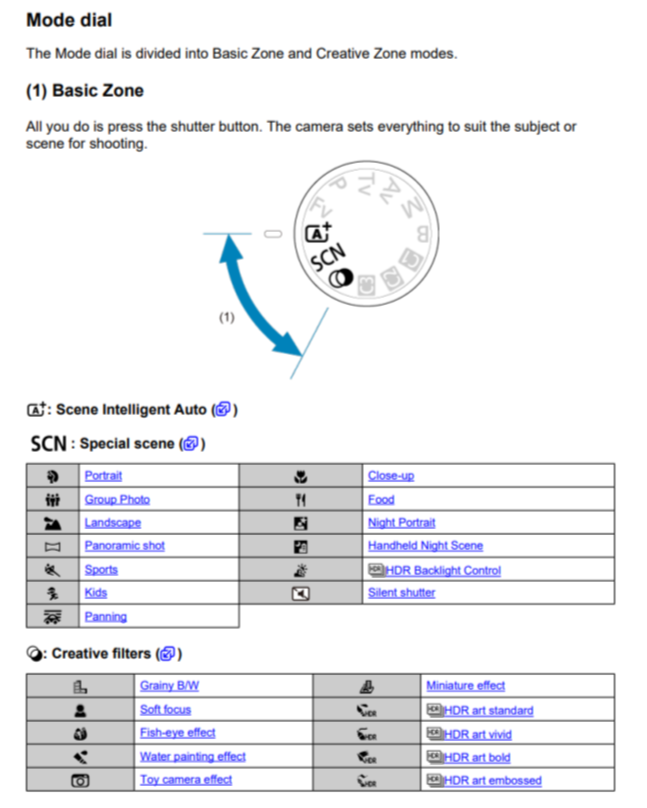
A+ Scene Intelligent Auto (fully automatic)
Special Scene modes: Portrait, Group Photo, Landscape, Panoramic Shot, Sports, Kids, Panning, Close-up, Food, Night Portrait, Handheld Night Scene, HDR Backlight Control, Silent Shutter
Creative Filters
-
Fv: Flexible-Priority AE
P: Program AE
Tv: Shutter-Priority AE
Av: Aperture-Priority AE
M: Manual Exposure
B: Bulb (long exposures)
Basic Camera Functions
Turning the camera on
Move the power switch to the camera icon for stills, or the video icon for movies. The battery icon on screen shows how much charge is left. Switch the camera off when you're not using it.
Using the screen
The screen flips out and can tilt up or down or turn to face the front, which helps with high and low angles. Close it facing the camera body when you've finished, to protect it.
Using the viewfinder
Look through the viewfinder and it switches on automatically. If the display looks blurry, turn the small dial beside the viewfinder until it's sharp. The viewfinder and screen can't be used at the same time, and the viewfinder won't work while the screen is flipped out.
Holding the camera
Hold the grip firmly with your right hand and support the lens from underneath with your left. Keep your elbows against your body and stand with one foot slightly forward. This keeps the camera steady and reduces blur.
The shutter button
The shutter button has two stages. Press halfway to focus and set the exposure. Press all the way down to take the picture. Pressing halfway also takes you out of the menus and back to shooting.
Main dial
Turn the Main dial to change settings such as shutter speed or aperture. It's also used after pressing a button, for example to change ISO, drive mode, focus mode or white balance.
Quick Control dial
Turn the Quick Control dial to set exposure compensation, or the aperture when shooting in Manual mode. Like the Main dial, it can also change a setting after you've pressed a button.
Multi-controller
The multi-controller is a small joystick that moves in eight directions and can also be pressed in. Use it to move the focus point, navigate menus and the Quick Control screen, and move around a magnified image during playback.
M-Fn button
Press the M-Fn button, then turn the Main dial to quickly change ISO, drive mode, focus operation, white balance or flash exposure compensation.
AF-ON button
Pressing AF-ON focuses the camera, the same as pressing the shutter button halfway.
LOCK button
The LOCK button stops settings being changed if you knock the dials, joystick or touchscreen by accident. Press it again to unlock.
INFO button
Each press of the INFO button changes how much information is shown on the screen or in the viewfinder.
Menu operations and settings
Press MENU to open the menu.
Press Q to move between the main tabs.
Turn the Main dial to move between the pages within a tab.
Turn the Quick Control dial to select an item and press SET.
Choose an option (the current setting shows in blue) and press SET to confirm.
Press MENU to return to shooting.
A greyed-out item means another setting is overriding it.
Quick Control
Press Q to bring up the most-used settings on one screen. Select a setting with the joystick and change it with the dials. It's the fastest way to adjust settings without going into the full menu.
Touchscreen operation
Tap the screen to select settings and menu items, and drag your finger to scroll. You can also tap the Q icon on screen to open Quick Control.
Inserting and removing memory cards
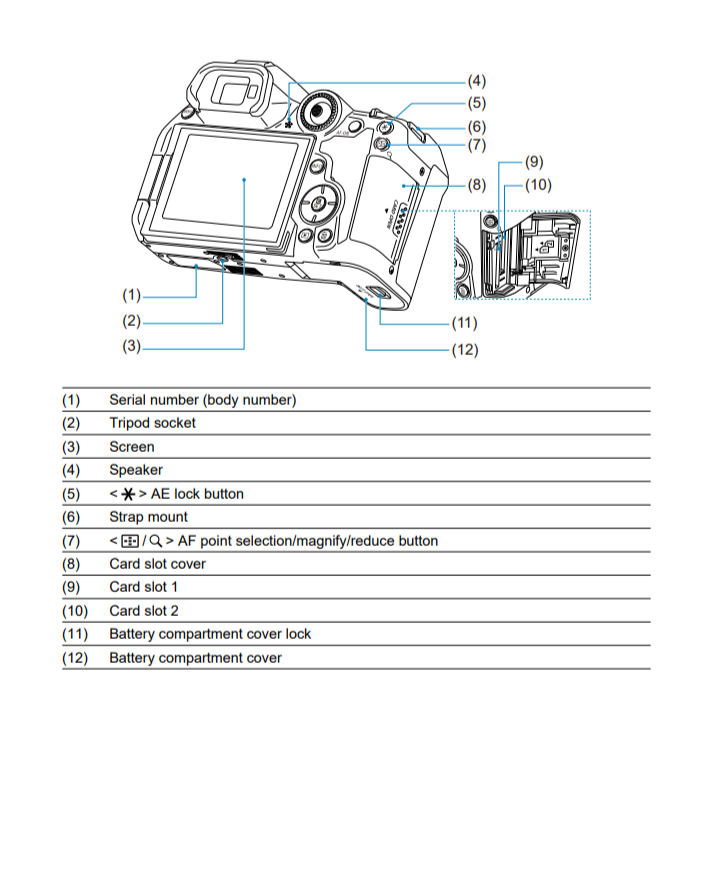
The camera holds two SD cards; Card 1 is the slot nearest the back. Insert the card with the label facing you until it clicks. To remove it, switch the camera off, wait for the access light to go out, then push the card in gently to release it. Never open the card door while the access light is on.
Basic Zone
In the Basic Zone modes, the camera sets everything automatically. You just point and shoot.
A+ Scene Intelligent Auto Fully automatic. The camera reads the scene, chooses the best settings and adjusts focus for still or moving subjects. You can also tap a face on the screen to focus on it. The focus point turns green when a still subject is sharp, and blue when it's tracking a moving one.
Special Scene modes (SCN) Turn the Mode dial to SCN, then choose the scene that matches what you're photographing.
Portrait Blurs the background so the person stands out, and makes skin and hair look softer. For the best effect, leave plenty of space between your subject and the background, zoom in, and make sure the focus point is on the face.
Group Photo Keeps everyone in focus, from the front row to the back. Zoom out towards the wide end and take a few shots, as someone will usually blink.
Landscape Keeps everything sharp from near to far, with vivid blues and greens. Zoom out to the wide end. The flash is not available in this mode.
Panoramic Shot Creates one wide image from a series of shots. Hold the shutter button all the way down and move the camera steadily in the direction of the arrow on screen.
Sports For moving subjects. The camera tracks the subject and shoots continuously while you hold the shutter button down. The focus point turns blue while it's tracking.
Kids For active, fast-moving children. It tracks movement, shoots continuously and gives vibrant skin tones.
Panning Follow a moving subject with the camera as you shoot. The subject stays sharp while the background blurs, giving a sense of speed.
Close-up For small subjects such as flowers or objects. Use a simple background, get as close as the lens allows, and zoom in.
Food Makes food look bright and appetising, and reduces the orange tinge from indoor lighting. You can adjust the colour tone warmer or cooler.
Night Portrait For people against a night-time background. This mode needs an external flash, and a tripod is recommended.
Handheld Night Scene For night scenes without a tripod. The camera takes four shots and combines them into one to reduce blur. The flash is not available in this mode.
HDR Backlight Control For scenes with a bright background, such as a person in front of a window. The camera takes three shots at different exposures and combines them, so shadow detail isn't lost.
Silent Shutter Takes pictures with no shutter sound or beeps. Useful at events and in quiet settings. Continuous shooting and flash are not available, and fast-moving subjects may look distorted.
Creative Filters Applies effects as you shoot, which you can preview on screen first. The options include Grainy black and white, Soft focus, Fish-eye, Water painting, Toy camera, Miniature and HDR art. RAW files are not available in this mode.
Creative Zone
In the Creative Zone modes, you choose the settings yourself, which gives you more control over how your pictures look.
Fv: Flexible-Priority AE You choose which of shutter speed, aperture and ISO to set yourself and which to leave on Auto, and you can add exposure compensation. It can work like P, Tv, Av or M depending on what you set, so it's a flexible all-in-one mode once you're confident.
P: Program AE The camera sets the shutter speed and aperture for you, but unlike A+ you stay in control of things like focus area and white balance. To change the combination the camera has chosen, press the shutter button halfway and turn the Main dial.
Tv: Shutter-Priority AE You set the shutter speed and the camera sets the aperture. A fast shutter speed freezes movement, while a slow one blurs it. If the aperture value blinks, the picture will be too dark or too bright, so adjust the shutter speed or ISO until it stops.
Av: Aperture-Priority AE You set the aperture and the camera sets the shutter speed. A low f-number (such as f/2.8) blurs the background, which is ideal for headshots. A higher f-number keeps more of the scene in focus, which is better for groups. If the shutter speed blinks, adjust the aperture or ISO until it stops.
M: Manual Exposure You set both the shutter speed and the aperture: the Main dial sets shutter speed and the Quick Control dial sets aperture. Use the exposure level indicator on screen to check whether your picture will be too dark or too bright. If ISO is set to Auto, the camera will still adjust brightness for you.
B: Bulb (long exposures) The shutter stays open for as long as you hold the button down. It's used for night scenes and fireworks and needs a tripod, so you're unlikely to need it for RCN work.